10 Accessories You Might Need When Buying A DSLR Camera For The First Time

Photography isn't the cheapest hobby to get into - even the most basic, entry-level DSLR cameras cost around £200 (US$280 approx.). In an ideal world, that would be the only purchase you'd have to make - get the camera and start taking photos. In reality, there are certain "extras" that you will want to make a priority, at the same time as buying your DSLR. On top of that, as you get more experienced with your sophisticated camera and get more and more hooked on this fascinating hobby, there are other accessories that you may also want or need.
These are ten accessories that I own and use on a regular basis, which you may wish to consider acquiring, sooner or later. I've ranked them in order of most important, to those that are really useful, but which can be added at a later date (if wanted):
1. SD Memory Cards
Put simply, no memory cards = no photos. SD Memory Cards are usually the tool that DSLR cameras use to record all those photos (and videos, if your DSLR has video recording capability). The memory cards are to digital cameras what film was too, er, non-digital cameras. The big advantage that memory cards have over photographic film is you can review your images immediately, via the back of your DSLR's LCD screen and delete those that aren't good enough. The cost of a single SD Memory Card will typically depend on its capacity and speed. With regards to capacity, these days, memory is commonly measured in Gigabytes (GB); the higher the GB number, the more photos and/or larger video files (longer video recording durations) you'll be able to create. So, for example, a 64GB memory card has greater storage capacity than a 4GB card. The other factor affecting the price is likely to be the read/write capacity.


This is measured in megabytes per second (MB/s), such as 95MB/s. You always want the fastest read/to write speeds you can purchase, as this will reduce the time it takes for each photo to be recorded (written) to the memory card and previewed (read), such as when you're looking at the images on your camera's LCD screen. The write speed is most important, as slower write speeds will take longer for each photo to be recorded to the memory card, which might mean missing photo opportunities if the card takes its time to free up processing ability to record the next image.
2. Camera Bag / Backpack
Once you've got the memory card (enabling you to take photos), your next priority purchase will be somewhere to store your camera, both when taking it out and about and when you're not using the camera. A good quality camera bag will cushion your camera and accessories from occasional knocks or scrapes that can happen from time to time. Some of the more premium camera bags will also have more space and compartments to keep your camera and accessories organized, as well as cool features, such as quick-access hatches, that allow you to grab your camera without having to open up the entire main compartment.

Whether you get a satchel type bag that you sling over a shoulder or a camera backpack, depends on how you envisage using your camera. A camera backpack, such as the Vanguard Up Rise II 45, which is what I bought, is great for those intending to hike about with their camera - the twin strap design will help to evenly spread the load on your back; a satchel may be more ideal for taking your camera around town, to do street photography, where you can whip out your camera from the bag at your side, without having to take off the entire bag just to access your camera (which you do with a backpack - I still prefer backpacks, but that's a personal choice).
3. Extra Camera Batteries
There's nothing worse than being out with your camera, in the groove and snapping away when you suddenly notice your single camera battery about to die. Getting hold of an extra couple of batteries, for your specific brand and model of camera, will ensure you're only sidelined for as long as it takes you to pop out the wasted battery, dip into your camera bag for a fully-juiced spare battery and slot it into your DSLR. One option is to buy the official batteries sold by the manufacturer of your camera brand. However, there are a number of third-party companies who provide batteries at a more reasonable price.


For instance, a single battery for the Panasonic GH4 costs £65 (US$90 approx.). Compare that to the batteries offered by Ex-Pro - you can get TWO batteries for the GH4 for £29 (US$40 approx.). I've tested such third party batteries and I just don't notice any difference in performance. I was initially skeptical about not getting official Panasonic batteries, but there are good third party alternatives that work efficiently well and are far more economical to buy. I've used Ex-Pro and Hahnel batteries (the former for the GH4 and the latter for my Panasonic FZ1000), both without a problem. I'm a third-party convert when it comes to buying DSLR batteries. The money you save can go towards other accessories on this list.
4. Tripod
For a while, you might be content to take photos handholding your camera, especially if your DSLR's lens has image stabilization built into them (this helps to smooth out a lot of juddering and shaking caused by your movements). However, if you intend to explore either landscape photography or long exposure photography (including light painting, where you use flashlights and all sorts of colorful LED light sources to add interesting color detail into an otherwise bland scene), you will want to rest your camera on a stable platform.
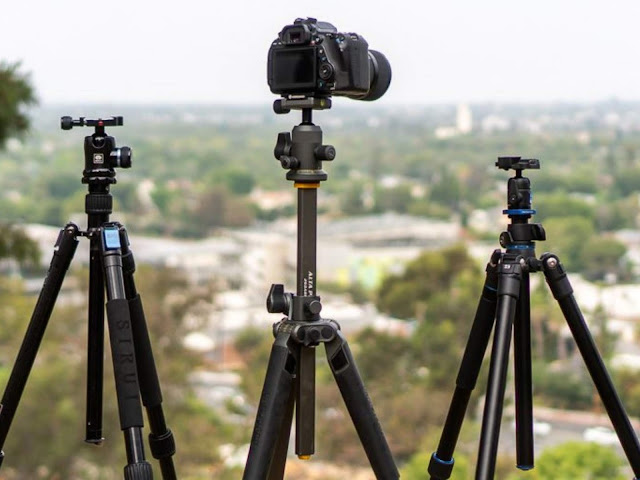

The most convenient and practical option is the tripod - but, not any old tripod. You will want a quality tripod, one that will comfortably take the weight of your DSLR camera (I had a relatively cheap tripod that I used successfully with a compact camera, but when I tried using it with my bulky Panasonic FZ1000 bridge camera, the mounting bracket wasn't able to hold the weight and it would droop downwards, since it was one of those side-hinged mounting brackets, rather than one that's screwed in centrally). Your choice of the tripod will typically be either aluminum or carbon fiber. The latter will be more expensive, but more lightweight, which makes it the choice for those looking to trek out and about with both camera and tripod.
The aluminum tripods are noticeably heavier but are less expensive. In addition to those more traditional style tripods, I also want to highlight some quirky alternatives, such as the Gorilla Pods (which have unique folding legs that can adapt better to uneven surfaces than a traditional stiff-legged tripod); the Ultra Pod II (a small, lightweight tripod of rugged plastic construction, which is excellent for hikers. It has a Velcro strap integrated into one of the legs, which enables you to tie the tripod to things like tree branches or fence posts. This is the smallest tripod I own and it goes into my camera backpack. I use whenever I don't want to take out my larger, carbon fiber 3LT "Brian").
5. Lens Filters
There are times when you want that little bit more control over the light that comes into your camera's sensor than the naked lens allows. To do this, you can attach different lens filters. The most popular filters you may wish to consider buying, all of which I own, are the Circular Polarizer (screws over the lens and helps to cut through the haze from the sun. It also takes out glare reflected off the surface of the water, even enabling your camera to see through to what lurks beneath the water and can help to make colors more rich and vibrant)


A 10-Stop Neutral Density Filter (an ultra-dark filter that enables you to make water look silky smooth and make clouds look like they're whooshing through the sky); and a Graduated Neutral Density Filter Kit (it comes in two parts: you need to purchase the ring adapter for the specific diameter of your lens, such as 58mm; then you purchase the filter kit, which typically contains a filter holder that clips onto the ring adapter, and a selection of graduated filters, with one end clear, which fades to dark at the other end, allowing your camera to expose equally for the sky and the relatively darker elements on the ground; they work best with landscape photography, when you have a clear line of sight to the horizon).
6. External Flash (Speedlight)
I was initially reluctant to pay for an external flash, thinking I could "get by" with just my digital camera and simply adjust a mixture of the Aperture, Shutter Speed and ISO settings, to get the right balance of light to correctly expose the photos. However, there are times when you want to properly expose for the background, while also helping to illuminate your main subject (especially when it comes to photographing people). You just can't do this without help from the flash - and ideally an external flash unit, rather than the pop-up flash on top of the most modern DSLR camera.


Which doesn't do a very good job at creating aesthetically pleasing light (the best you can do with a pop-up flash is to learn where the controls are that turn the flash power down, so your images don't have that "over-flashed" look to them)? If you want the most control over your lighting and get the right amount of light so that you end up with a nice image, especially in low light conditions (where most digital camera sensors will struggle), you will want to be able to angle your flash, either by taking it off to the side (typically pointing at a 45 degree angle to your subject) or to be able to direct the flash head so the light bounces off a ceiling or a wall... and in order to do this, you're going to need an external flash unit (also known as "speed lights").
7. Hot Shoe Adapters
If you've purchased an external flash and want to move it to one side, the best option is to get an adapter. There are Hot Shoe Adapters that have a coiled cable running between two connection sockets - one goes onto the Hot Shoe of your camera (the place where you can also mount your external flash unit) and the other end connects to your flash. On the bottom of the one that the flash is connected to, there is typically a screw hole.


Which allows you to screw it onto a tripod so that you don't have to juggle holding your camera in one hand and the flash in the other. If your camera has wireless capability, you can also buy a "Cold Shoe Adapter", which is just a small square adapter that you'll screw onto your tripod and then mount your flash - there are no cables because you're able to remotely operate your flash from the menu on your sophisticated DSLR. This is something I'm able to do with both my Panasonic FZ1000 and Panasonic GH4.
8. Battery Grip
I was toying with whether to list a "remote cable release" or a "battery grip", for this optional purchase on my list of ten accessories. The reason I chose not to opt for the remote cable release is that, while I do own one, most DSLRs allow you to set a short time delay for before the camera takes the photo, and I find myself more often using this feature than bothering to connect my remote cable release. I opted to list the Battery Grip, because I find it extremely useful to be able to keep photographing for longer, without having to think about changing the battery.


I have a third-party battery grip, by Ex-Pro, for my Panasonic GH4 (rather than paying the premium for an official Panasonic grip). It's really good as, in addition to being able to insert an extra battery for my GH4, it also has buttons on the side that bring up some core functions, such as ISO, White Balance, Exposure Compensation, plus an extra function button, which is assigned to bring up the digital spirit level on my GH4. The function buttons on the side of the battery grip are useful for when the camera high up on my tripod and I can't see these buttons that are also on the top of my camera). The grip part of the unit enhances the overall size of the camera, so it's easier to use when handholding the camera in portrait orientation.
9. Quick Release Shoulder Strap
Most DSLR cameras come with a standard camera strap, which is fine - they do a good job at making sure you don't drop your camera on the floor when walking about with it. The problem, for me, came when having to take the shoulder strap off, to take long exposure photos, with the camera on the tripod - with the strap still on the camera, it may introduce vibration into the camera, especially on windy days, which could ruin your photos with unwanted blur.


For a time, when I was still relatively new to photography, I was content to fiddle with the strap to undo it and remove it, and then fiddle with it again to reattach the strap when I wanted to move off to new location (but not put my camera back in the bag). However, once the novelty of having this new, sophisticated camera, had worn off, this process quickly became a tedious chore. The solution was to purchase a quick release camera strap. With this, you have two fobs that you connect to the camera's usual strap anchor points, and then the strap part clips in and it's just a simple two-button press to remove. This is another optional purchase, but I'm really glad I've got it.
10. Stepping Rings
When you just have one lens for your DSLR, you can buy a range of different lens filters (such as those mentioned above; see accessory #5) and simply interchange them as and when needed. The problem comes when you purchase a new lens and it's either a larger or smaller diameter than your first lens (the one that fits all your filters). It could be a costly experience having to repurchase all those filters just so you can use them with your new lens. Fortunately, some clever person has invented Stepping Rings.


These are basically individual metal rings that screw together, enabling you to screw one ring onto your lens, another onto your chosen filter, and however many intermediate-sized rings it takes to help you either "step up" or "step down" from the lens to the filter. It should be noted that it's preferable if your lens is smaller than the filter (and not the other way round) because, if you're trying to STEP DOWN from a larger lens, onto a smaller filter, then you will encounter "vignetting", which is when you see black edges around all of your images - these edges, in this case, will be the stepping rings that are getting in the way of your DSLR's sensor.
And that concludes my list of 10 accessories you might need when buying a DSLR camera for the first time.
For more information about how to learn digital photography read us this article.
For more information about how to learn digital photography read us this article.


Comments
Post a Comment